Epinova DXP deployment extension for Azure DevOps Part 4 – How to set up a CI/CD pipeline (Prerequisites and Release candidate strategy)
This post will describe how to implement Azure DevOps pipelines that uses the Epinova DXP Deployment extension (Beta) to build and deploy to Episerver DXP.
This blog post is the fourth in a series
- Part 1: Introduction
- Part 2: Branch and release strategies
- Part 3: A closer look at the Epinova DXP deployment extension for Azure DevOps
- Part 4: How to set up a CI/CD pipeline (Prerequisites and Release candidate strategy)
- Part 5: How to set up a CI/CD pipeline (Classic Strategy, Reset and Hotfix pipelines)
This post will describe how to implement Azure DevOps pipelines that uses the Epinova DXP Deployment extension (Beta) to build and deploy to Episerver DXP. We’ll use the Release candidate strategy as described in part 2 in this series to implement CI/CD pipelines that builds and deploys the develop branch to the Integration environment as well as building and deploying any release branches to the Preproduction environment. This can then in turn be deployed to the Production environment once all final testing is done and you have an approval to go live with your changes.
We will create the pipelines by using YAML files so it should be as simple as possible.
WebPackage vs NuGet
In the first part of these series we described that there are 2 different package formats that you can use to deploy to Episerver DXP. We can:
- Use a WebPackage (IIS web package) that use the “Azure App Service Deploy” task.
- Use a NuGet package that will be deployed with “Deploy NuGet Package (DXP)”.
The WebPackage method is much quicker since it just deploys the WebPackage to the IIS on the target environment. The NuGet package method is slower because it will deploy the site to the environment slot first. When the slot is up and running you can verify the deployment before completing the deployment to the environment by switching slots.
One thing that should be noticed: Depending on which method you choose; you’ll need to handle web.config transformation differently. If you use a WebPackage it will use the transformation specified for msbuild in the build pipeline step. The transformation will be made in the build and included in the web.config in the WebPackage. If you use the NuGet method, DXP will transform the web.config with web.[environmentname].config if you have one in your website root folder.
In this post we will give you example of both methods.
Prerequisites
Create variable group
All tasks and YAML files are using variables that can be reused by one to many pipelines. In Azure DevOps you can use a variable group for this use case.
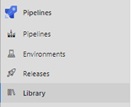
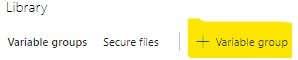
In the menu you can find the Library. There you can create a variable group with the name “DXP-variables”. Note: If you use the name “DXP-variables” you don’t need to change any names in the YAML-files that we will use.
Variable group information
Variable group name: DXP-variables
Allow access to all pipelines: True.

Click the “Add” button to add a new variable. We’re going to add the following variables:
- DXP.ProjectId
- ClientKey
- ClientSecret (Make as password variable)
- Integration.SlotUrl
- Integration.Url
- Integration.UrlSuffix
- NuGetPackageNamePrefix
- Preproduction.SlotUrl
- Preproduction.Url
- Preproduction.UrlSuffix
- Production.SlotUrl
- Production.Url
- Production.UrlSuffix
Gather variable information
This section helps you how you get the information that need to provide each variable.
ClientKey, ClientSecret, DXP.ProjectId
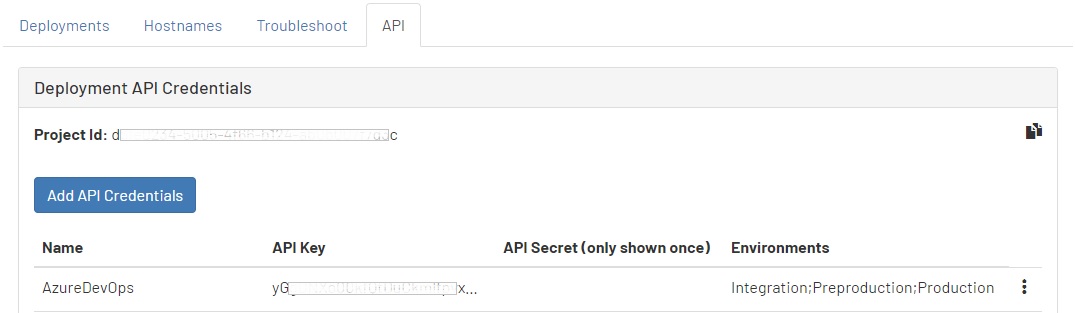
Go to the Episerver DXP Paas portal (https://paas.episerver.net) and log in and click on the link to the project that you setup the deploy for. On the project page you should click on the tab “API”.
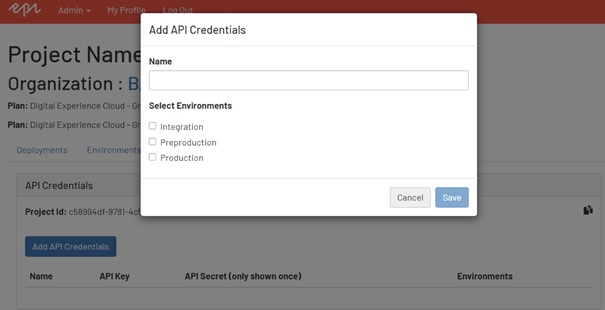
Click on the “Add API Credentials” and give it a name. Select all environments (Integration, Preproduction, Production). After clicked save you will receive a ClientKey and ClientSecret that you can copy to your variables.
After created the credentials, the list will be populated with the latest credential. In this view you can also find the ProjectId. It is easy to click the copy button to save the information to your memory.
SlotUrl, Url
When you do a deploy to an environment in Episerver DXC the package will be deployed to a slot. That slot can be verified by you and/or the customer. If everything looks ok and your verification tests passes, the package can be deployed to the environment. The SlotUrl variable is the URL to the slot during deployment and the URL is the URL to the environment that you deploy to, for example:
- SlotUrl: https://epinova012prod-slot.dxcloud.episerver.net/
- Url: https://www.epinova.com/
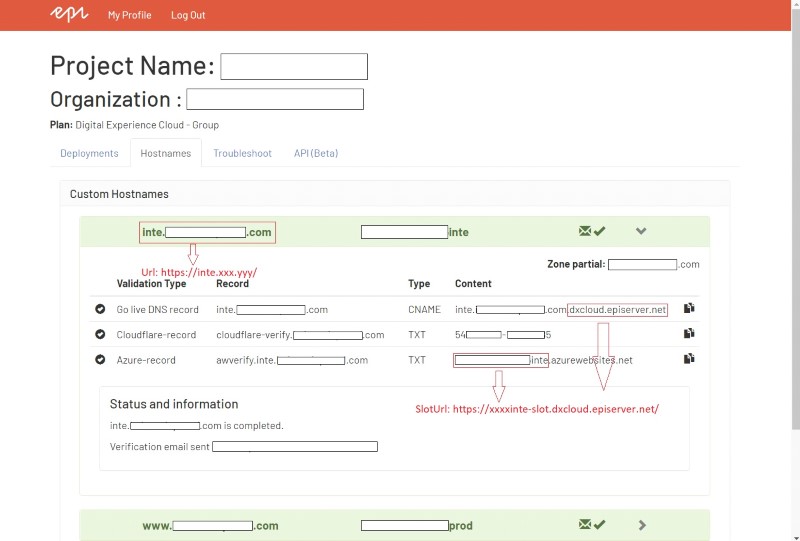
You get these URLs in the Paas portal by selecting the project that you’re setting up the CI/CD for. On the project page you should click on the tab “Hostnames”.
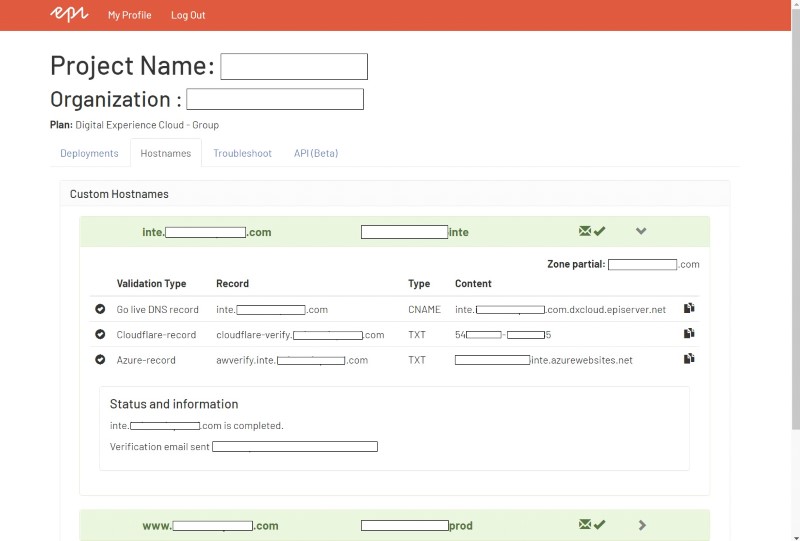
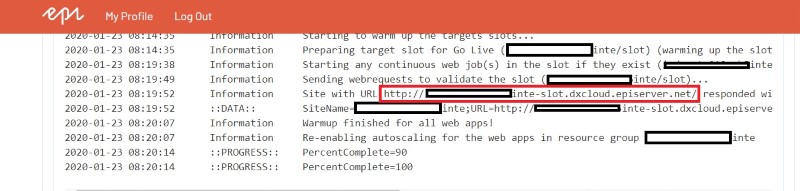
Each environment should have their own accordion. To get the SlotUrl you need to solve a little puzzle. Take the beginning of the “Azure.record” URL. Add “-slot”. And then take the last 3 parts of the “Go live DNS record”. The “Url” is shown in the heading for the accordion. See the image below for an example:
If you have deployed manually earlier for this project you can also look at the log files and see the URLs.
UrlSuffix
The URL suffix are used by the test step when a request will be done against the deployed environment with example [Integration.SlotUrl] + [Integration.UrlSuffix].
Example: https://epinova012inte-slot.dxcloud.episerver.net/Util/login.aspx
So, you can use this suffix to request your site even if you have turned off the anonymous access to the site.
NuGetPackageNamePrefix
The prefix for the NuGet package name.
Example: If the value is “MyProject.Website” the NuGet package will get the name “MyProject.Website.cms.app.20200414.1.nupkg”.
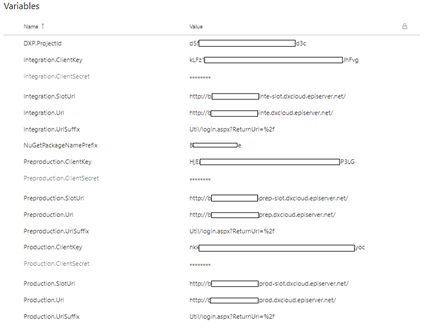
Result
When all the variables in the group has been set you can save the variable group.
When you are done it should look something like this.
Create environments
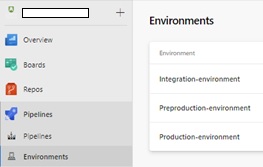
When you are using YAML you need to create environments since this is the only way to add manual intervention before starting to deploy to the next environment when the first environment has completed in a multi environment pipeline. You need to register these environments in Azure DevOps.
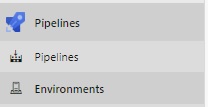
![]()
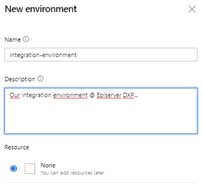
Create 3 environments. “Integration-environment”, “Preproduction-environment”, “Production-environment”.
Note: These environment names are used in the sample YAML files – so we recommend to use these names, and if not, don’t forget to update the YAML-files at a later stage.
Example where you need to change environment in YAML file:
jobs:
- deployment: ReleaseProd
displayName: 'Deploy to Production'
pool:
vmImage: 'windows-latest'
environment: 'Production-environment'
When you create an environment, you can use “None” as resource.
When you have created the environments, the list should look like this:
Set approval
To make sure that you get a change to approve a deployment before continuing to the next environment we need to add an approval to this environment. In our recommended flow – this is done after a successful deploy to Preproduction before starting deployment to the Production environment. If this is not done – you’re Pipeline will automatically start deploying to the Production environment.
We recommend that you add approval to the preproduction and production environment.
To define an approval on an environment:
- In your Azure DevOps project, go to the environment that needs to be protected.
- Navigate to Approvals and Checks for the environment.
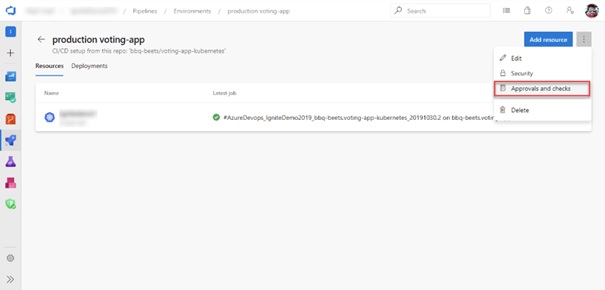
- Select Create, add the approvers and an optional message, and click Create again to complete adding the manual approval check.
You can add multiple approvers to an environment. These approvers can be individual users or groups of users. When a group is specified as an approver, only one of the users in that group needs to approve for the deployment to move forward. Using the advanced options, you can configure if a subset of approvals is enough or if you need all the specified users to complete the approval. You can also restrict the user who requested (initiated or created) the run from completing the approval. This option is commonly used for segregation of roles amongst the users.
When you run a pipeline, the execution of that run pauses before entering a stage that uses the environment. Users configured as approvers must review and approve or reject the deployment. If you have multiple runs executing simultaneously, you must approve or reject each of them independently. If all required approvals are not complete within the Timeout specified for the approval, the stage is marked failed.
Create Service connection to Azure (only for WebPackage)
If you want to use the WebPackage method and to be able to deploy quickly to the Integration environment, you can use the “Azure App Service Deploy” task. You need a service connection to Episerver DXP/Azure. To get this, you’ll have to send an email to Episerver support where you request for a “Service principal” for your DXP project.
When you retrieved the “Service Principal” you should:
- Go to the project settings in Azure DevOps.

- Go to “Service connections”.

- Click the button “New service connection”.

- Select the “Azure Resource manager”
- Select the “Service principal(manual)”
- Specify the Subscription and give the connection a name:
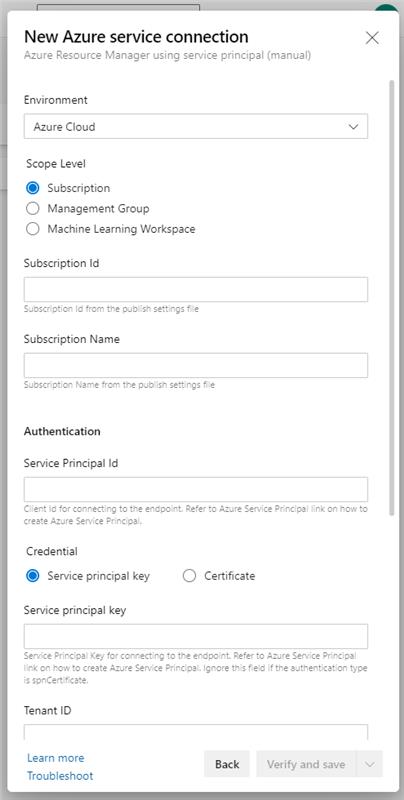
Now the description gets foggy, but somewhere in the process you should see a field with the label “Service Principal Id”. This is where you should add the “Service Principal” you received from Episerver support.
YourWebsite.csproj
There are some changes that could be good to implement in your csproj file so that your project works more out of the box with the YAML files that you are going to use. What we want to do is to include build and packaging of any frontend assets that are used in the project. Instead of having CI/CD build tasks that runs NPM install, NPM run build etc. we can add some commands into the project so that is solved automatically by MSBUILD. The code example below makes sure that when MSBUILD create a WebPackage it will run “npm install”, “npm run build,” and include the created output folder “dist” into the project. The node “CopyAllFilesToSingleFolderForMSDeployDependsOn” will be used when MSBUILD create a WebPackage. And “CopyAllFilesToSingleFolderForPackageDependsOn” will be used when MSBUILD create a NuGet package.
<PropertyGroup>
<CopyAllFilesToSingleFolderForMSDeployDependsOn>
BuildFrontendAssets;
AddFrontendAssetsToPackage;
$(CopyAllFilesToSingleFolderForMSDeployDependsOn);
</CopyAllFilesToSingleFolderForMSDeployDependsOn>
<CopyAllFilesToSingleFolderForPackageDependsOn>
BuildFrontendAssets;
AddFrontendAssetsToPackage;
$(CopyAllFilesToSingleFolderForPackageDependsOn);
</CopyAllFilesToSingleFolderForPackageDependsOn>
</PropertyGroup>
<Target Name="BuildFrontendAssets">
<Message Importance="high" Text="Deleting node_modules and dist folder." />
<RemoveDir Directories="node_modules;dist" />
<Message Importance="high" Text="Installing node modules…" />
<Exec Command="npm install" WorkingDirectory="$(WebProjectOutputDir)" />
<Message Importance="high" Text="Finished installation of node modules." />
<Message Importance="high" Text="Running frontend build script…" />
<Exec Command="npm run build" WorkingDirectory="$(WebProjectOutputDir)" />
<Message Importance="high" Text="Finished frontend build script." />
</Target>
<Target Name="AddFrontendAssetsToPackage">
<ItemGroup>
<_CustomFiles Include=".\dist\**\*" />
<FilesForPackagingFromProject Include="%(_CustomFiles.Identity)">
<DestinationRelativePath>dist\%(RecursiveDir)%(Filename)%(Extension)</DestinationRelativePath>
</FilesForPackagingFromProject>
</ItemGroup>
</Target>
When you have updated and saved the csproj file you need to commit and push it to your repository.
Summary – preparations
To be able to use YAML files that we will soon start playing with you should have:
- Created a variable group with the variables specified earlier in this blog post.
- Created 3 environments and added approvals for preproduction and production.
- Modified your project file to use the specified TargetGroup to build your client files.
- [Optional] If you want to use “Azure App Service Deploy”, you must have created a service connection to the Episerver DXP subscription.
Implement CI/CD pipeline: Develop => Integration
Finally - time to start implement some pipelines! I’ve separated this part in two:
- Webpackage deployment
- Nuget deployment
WebPackage method
YAML-files
We will start with downloading the YAML pipelines files that you are going to use. You need to download and store these two files in your solution. I suggest that you create a “pipeline” folder in your solution structure and place the YAML files in there. These are the files you can start with:
https://github.com/Epinova/epinova-dxp-deployment/blob/master/Pipelines/Develop-Inte_webpackage.yml
Before you commit and push these 2 new files to your repo. You should open the Develop-Inte.yaml file and add the service connection name and WebAppName that you created earlier in this guide.
variables:
- group: DXP-variables
#- name: webProjectDirectory
# value: '[SolutionName]/[ProjectName]' #Is used when using npm tasks in the build.
- name: azureSubscription
value: '[Replace with Azure subscription connection name]'
- name: azureWebAppName
value: '[Replace with Azure WepAppName name]'
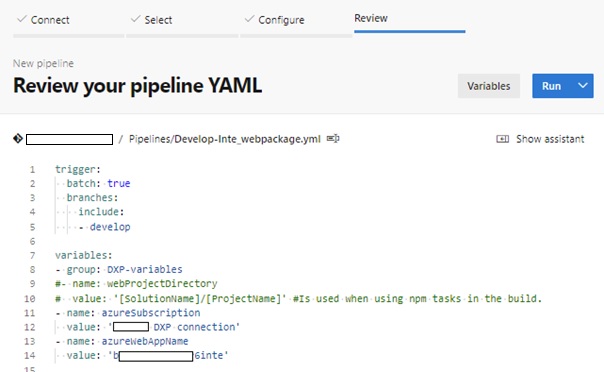
After I updated mine it looks like this:
variables:
- group: DXP-variables
#- name: webProjectDirectory
# value: '[SolutionName]/[ProjectName]' #Is used when using npm tasks in the build.
- name: azureSubscription
value: 'DXP connection'
- name: azureWebAppName
value: 'b*************6inte'
Setup the pipelines in Azure DevOps
Now it is time to create the pipelines in Azure DevOps.
- Login to you Azure DevOps and go to your project.
- Select Pipelines / Pipelines in the project menu.
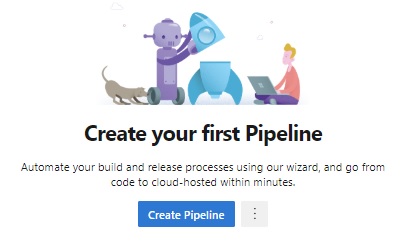
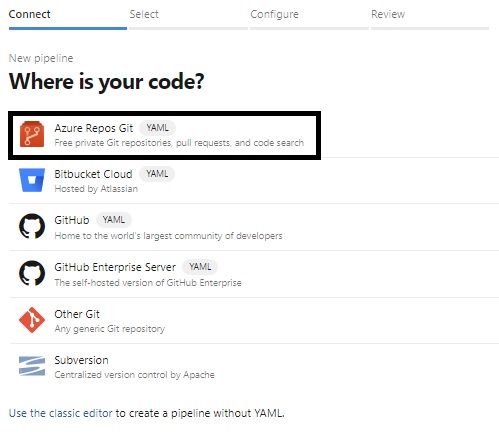
- Click on the “Create pipeline” button
- Select the repo type. In my case we have it in the Azure Repos Git.
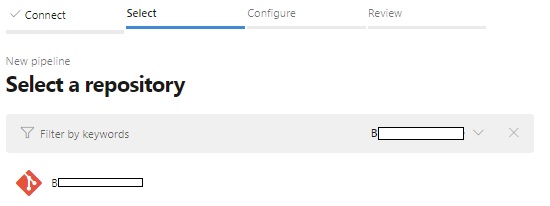
- Select your repo.
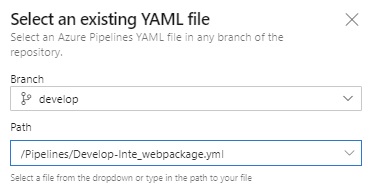
- Configure your pipeline. Select the “Existing Azure Pipelines YAML file” in the bottom.

- Select the YAML file that you want to create a pipeline from.
- Now you can test running this pipeline.
- The pipeline will now start.

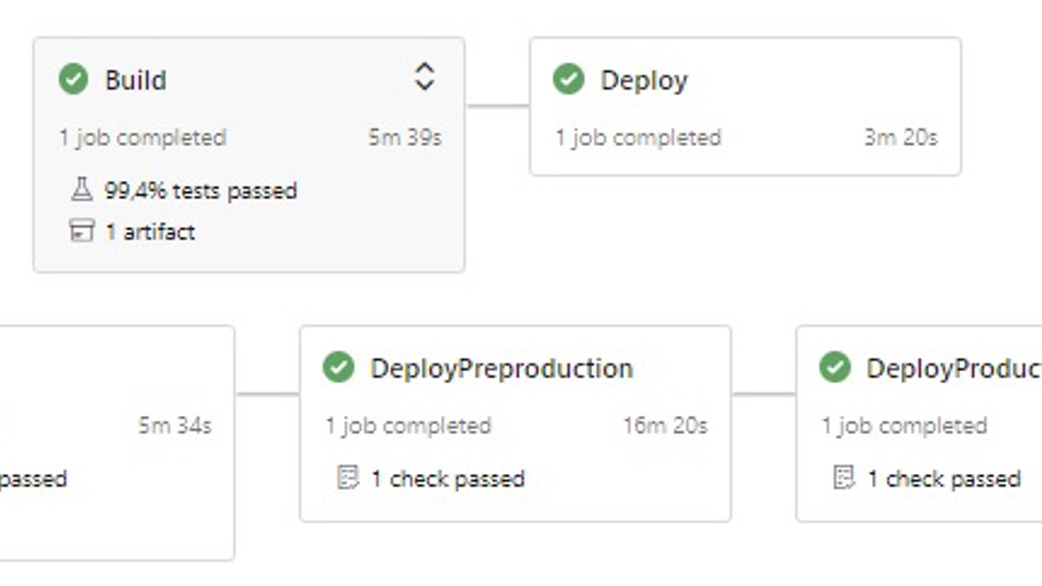
If everything is working as it should the result would be the following:
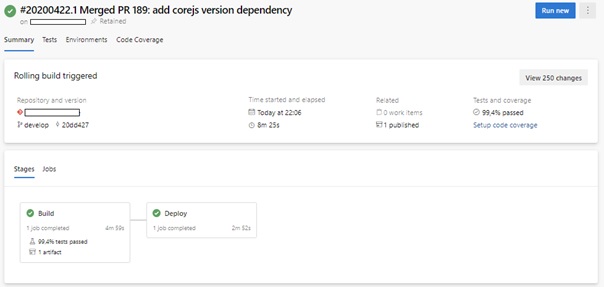
Tip: Go to the section “Rename the pipeline” so that you can give the pipeline a better name.
NuGet method
YAML-files
We will start to download the YAML pipelines files that you are going to use. You need to download and store these two files in your solution. I suggest that you create a “pipeline” folder in your solution structure and place the YAML files in there. These are the files you can start with:
https://github.com/Epinova/epinova-dxp-deployment/blob/master/Pipelines/Develop-Inte.yml
https://github.com/Epinova/epinova-dxp-deployment/blob/master/Pipelines/Release-PrepProd.yml
Setup the pipelines in Azure DevOps
Set up a the pipelines for deploying Nuget package(s) by following the same guide as for WebPackage except that you download and use the Develop-Inte.yml package instead.
Implement CI/CD pipeline: Release => Preproduction => Production
Now it is time to setup the pipeline for the ability to release to production. We will follow the branch and strategy (“Release candidate”) that we talked about in day 1.
Since you already have downloaded the Release-PrepProd.yaml file and stored it in your new pipeline folder in the earlier step we can now start implement it.
Setup the pipeline in Azure DevOps
- Start with setting up a new pipeline for with the Release-PrepProd.yml file (using steps 1-7 from above) and name it Release-PrepProd.
- Create a new branch based out of the developer Give the new branch the name release/v1.0.0.
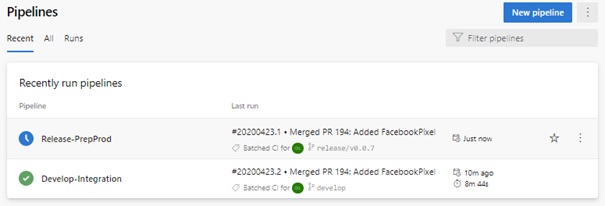
- Go back to the pipeline list and check that the Release-PrepProd pipeline has started.
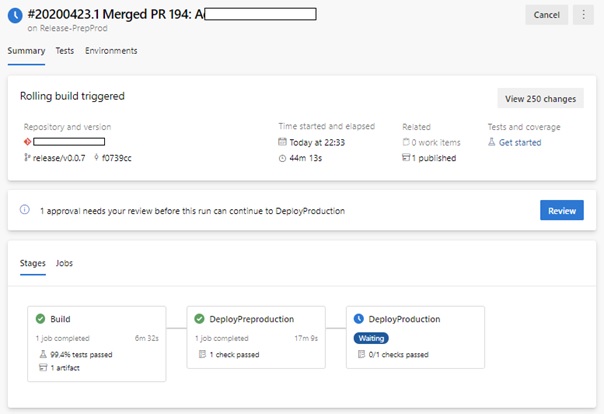
- When the pipeline has built the package it will ask for approval to deploy to the Preproduction
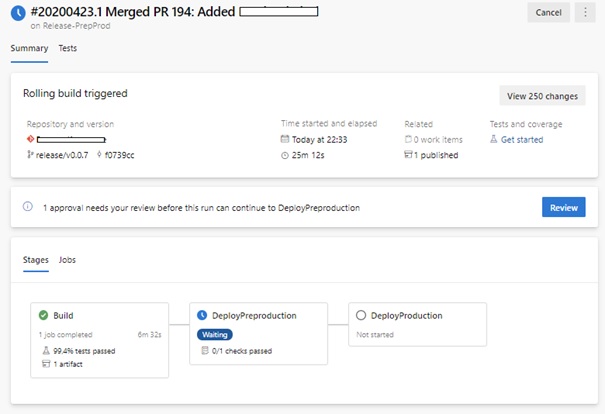
- Review and approve.
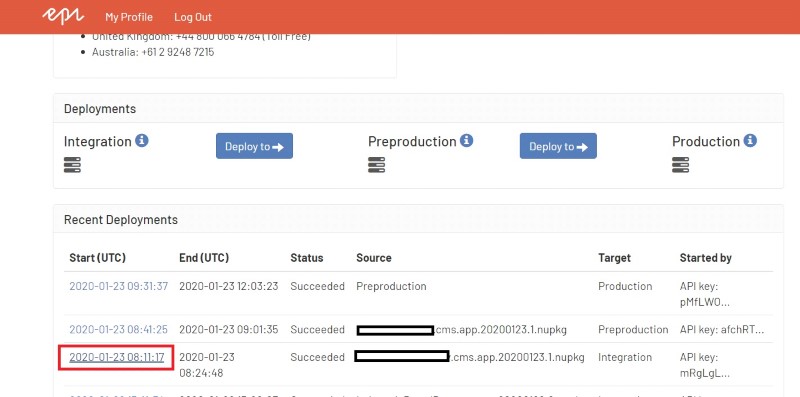
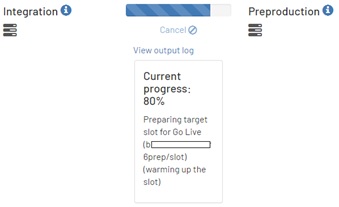
- During the deployment you will be able to see the status returned from DXP.
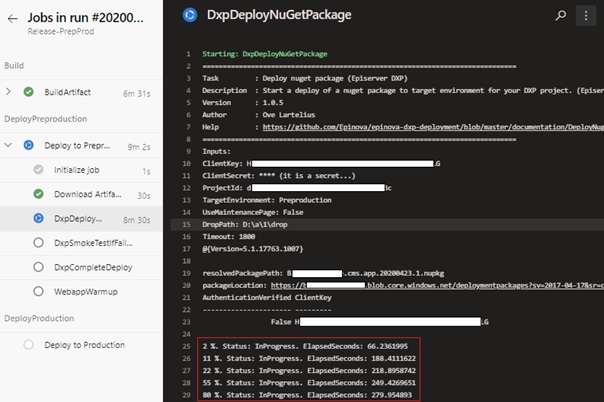
- In the passportal - you can also see the same status.
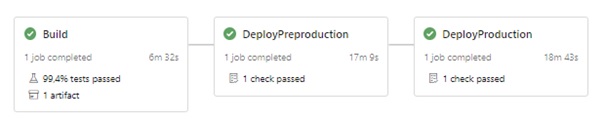
- When Preproduction environment is deployed and you have done final testing and gotten approval to go live with the changes - it is time to continue the workflow to deploy to Production.
- Hooray! We have now done our first deployment into the Production
Outro
You should now have set up your first pipelines to be able to deploy code to Episerver DXP. If this strategy does not fit your project the next blog post in this series shows how to set up a CI/CD pipeline that uses the Classic strategy that builds the master branch and deploys it to Integration=>Preproduction=>Production. We’ll also cover how to set up a Reset pipeline as well as how to handle hotfixes. Stay tuned!
For the latest documentation and guides please visit the repo on GitHub. Where all code, documentation and YAML files etc. exist.
https://github.com/Epinova/epinova-dxp-deployment
https://marketplace.visualstudio.com/items?itemName=epinova-sweden.epinova-dxp-deploy-extension
Go to Part 5: How to set up a CI/CD pipeline (Classic Strategy, Reset and Hotfix pipelines)

Vi vill gärna höra vad du tycker om inlägget
eZHKfi
<a href=https://finasterid.cfd>finasteride tablets 5mg where to buy</a> This chart lists the number of pills needed for an EC dose for many different brands of oral contraception