How to create a database user in Azure Portal
This blog post explains how to create a database specific login/user for each database so that you can reuse one SQL Server in Azure Portal for many databases.
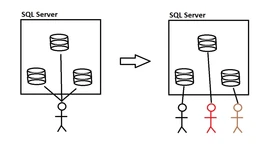
I have often seen that people create new SQL Server instances in Azure Portal for each database, to be able to get unique logins for each database which seems to have been an “easy” solution, since you can't create a database specific user/login in the Azure Portal user interface. The reasoning for this is that you don't want to use the same administrative account for different customer project databases on the same SQL Server. This way you can use the SQL Server administrative account in the connection string to avoid sharing the same username/password between projects. However, with this approach you will quickly end up having one SQL Server for each database (roughly). This problem is not unique for Episerver/Optimizely solutions but could be a case for all your projects in Microsoft Azure. I started looking into of there might be a better solution to this and found that it is possible to create user/login for a specific database. However, you need to do it manually by using either SSMS (SQL Server Management Studio) or a PowerShell script.
Using SSMS
If you want use SSMS for this, you can follow the [Microsoft documentation](https://azure.microsoft.com/en-us/blog/adding-users-to-your-sql-azure-database/)
Example connection string: Server=tcp:project1-dev.database.windows.net,1433;Initial Catalog=project1-cms-dev;Persist Security Info=False;User ID=project1-sa;Password=@wes0mep@ssw0rd;MultipleActiveResultSets=True;Encrypt=True;TrustServerCertificate=False;Connection Timeout=30;
- Open SSMS and connect to the SQL Server by specifying:
Server name:project1-dev.database.windows.net
Login:project1-sa
Password:@wes0mep@ssw0rd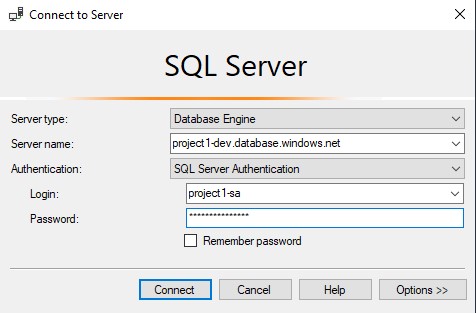
- Click on the "New Query" button in the menu.

- Copy the TSQL code below and paste into your query window. Replace the needed values. In the picture you can see the values that I have changed to demonstrate how I change the TSQL after my example connection string.

T-SQL:USE [master]Click on "Execute".
CREATE LOGIN _NewUsername_ WITH password='_NewPassword_';
GO
USE [_YourDatabaseName_]
CREATE USER _NewUsername_ FROM LOGIN _NewUsername_;
GO
EXEC sp_addrolemember 'db_owner', '_NewUsername_';
GO
- You have now added a new login/user to your database and can change your connection string. I will do the same with my example connection string so you see the result.
Modified connection string:Server=tcp:project1-dev.database.windows.net,1433;Initial Catalog=project1-cms-dev;Persist Security Info=False;User ID=project1dbuser;Password=mynew@wes0mep@ssw0rd;MultipleActiveResultSets=True;Encrypt=True;TrustServerCertificate=False;Connection Timeout=30;
Note: These users that you create like this can't login to the database with SSMS since they don't have that permission. However, this is possible to achieve if you set another role on the user/login.
Using PowerShell
Prerequisite
PowerShellGet
Since PowerShell Gallery is involved, you need to have PowerShellGet installed. Instructions how to install PowerShellGet (https://learn.microsoft.com/en-us/powershell/scripting/gallery/installing-psget?view=powershell-7.1).
Create Azure database user login
- First open up PowerShell prompt as an administrator.
- Start type “
Set-ExecutionPolicy -Scope CurrentUser Unrestricted”. This is to remove warnings if your environment does not trust these scripts. - Then install the EpinovaAzureToolBucket. “
Install-Module EpinovaAzureToolBucket -Scope CurrentUser -Force” - Add the code below and make the changes needed to fit your context.
            $sqlServer = "project1-dev.database.windows.net"

            $sqlServerUsername = "project1-sa"

            $sqlServerPassword = "@wes0mep@ssw0rd"


            $targetDatabase = "project1-cms-dev"

            $newUsername = "project1dbuser"

            $newPassword = "mynew@wes0mep@ssw0rd"

            $newUserPermission = "db_owner"

            Add-AzureDatabaseUser -SqlServer $sqlServer -SqlServerUsername $sqlServerUsername -SqlServerPassword $sqlServerPassword -TargetDatabase $targetDatabase -NewUsername $newUsername -NewPassword $newPassword  -NewUserPermission $newUserPermission

- After pushing the enter button the script will start to create the database user/login. And if everything is ok it can look like the following result.

You can also see that you will be able to copy the new connection string into your Episerver project and start using it.
Outro
I hope that this will help you in your journey to setup your projects and infrastructure in Azure portal in the way that fits you. For me it was a game changer at least.
Happy coding!

We would like to hear what you think about the blog post