Use Blazor components in Optimizely CMS admin/edit interface
Lab: Integrating Blazor Components into Various Aspects of Optimizely CMS admin/edit interface

Background
I´m a backend developer. I can change an existing CSS and have written JavaScript/jQuery during the years. But I´m so bad frontend developer that colleagues are crying or laughing.
Remember the time when Episerver CMS was more backend -isch and you could create custom plugins very easily in my perspective. But when more and more was solved with rocket science technology like Dojo and become more frontend heavy, I could not do that anymore.
My first step was to figure out how I could create these plugins with regular MVC functionality. And after some struggle I managed to do that. But since everybody now a days expect the interfaces to react like a single page application without page loads it is not enough to just use MVC.
Today I´m have gotten to become an old dog that have to little time and energy to learn stuff that is outside my comfort zone. Learn React or Angular did not fells like the right way to go (for me). Then an angel whispered in my ear… “Blazzzzzzzzor”.
I started to look at Blazor an realised that this was exactly what I needed. This could solve my problem. But how do I get this working in the CMS? I started to ask all AI tools and Google around this. Found blog posts that used Blazor in Optimizely CMS, but that was only for creating public pages with Blazor. I started to play around and managed to finally get it working.
And this is the result.
This is a long blogpost and will start with the basic implementation and setup the Blazor component. Then I have described each function type so that you can focus on the functions that is in your interest. The types are:
The demo project exists on GitHub if you would like to grab the source code. https://github.com/Epinova/BlazorAddonsDemo
Version and prerequisites
.Net 8
Episerver CMS v12.24.0
You need to have understanding of developing Optimizely CMS websites/add-on and how Blazor works to take advantage of this.
Basic implementation
Startup.cs
First step is to update the Startup.cs with extensions to start Blazor functionality.
services.AddServerSideBlazor();
And also, in the ApplicationBuilder you need to add:
app.UseEndpoints(endpoints =>
{
…
endpoints.MapBlazorHub();
endpoints.MapControllerRoute(
name: "default",
pattern: "{controller=Home}/{action=Index}/{id}");
…
});
With this we now can use Blazor components in the Optimizely CMS website project.
Example source code: https://github.com/Epinova/BlazorAddonsDemo/Startup.cs
Module.config
To get Optimizely CMS to reflect your DLL and find your gadget when you have created them, you need to have a module.config in the root that describe that.
Example source code: https://github.com/Epinova/BlazorAddonsDemo/module.config
If you already have a module.config. Make sure to add <add assembly="OptimizelyCmsBlazorComponentAddonsDemo" /> in your existing. And change the assembly name to your assembly name. Otherwise, you will get an exception when starting up the application because it cannot understand how it can load the gadget(s).
Layout(s)
When you work with Blazor you need to add <script src=”_framework/blazor.server.js”></script> right before the closing </body> tag on the pages where you will run Blazor components. Otherwise, there is no JavaScript that will manage the SignalR connection to the server. Since I don't want to change any of the existing layout pages I created two new different layout pages. The first is for CMS add-on page(s), setting(s), report(s) and global add-on page(s). The second is for gadgets that show up in the assets pane and where you do not want to use @Html.CreatePlatformNavigationMenu().
I created these layout pages in the shared folder: (/Views/Shared/*.cshtml).
Example:
_LayoutBlazorAdminPage.cshtml
Example source code:
https://github.com/Epinova/BlazorAddonsDemo/Views/Shared/Layouts/_LayoutBlazorAdminPage.cshtml
_LayoutBlazorGadget.cshtml
Example source code:
https://github.com/Epinova/BlazorAddonsDemo/Views/Shared/Layouts/_LayoutBlazorGadget.cshtml
Blazor component
Now it was time to create the Blazor component that we are going to reuse on all the following places just to see that is working.
Since we are working with feature folders, I wanted to place the Blazor component in the same folder as my feature. I called my feature “BlazorTest” and created the component there. (/Features/BlazorTest)
_Imports.razor
This is the file that will import all needed stuff for your Blazor component(s) so that you don't need to implement these usings in the top of your Blazor component(s).
Example source code: https://github.com/Epinova/BlazorAddonsDemo/Features/BlazorTest/_Imports.razor
MyBlazorCounterComponent.razor
Example source code: https://github.com/Epinova/BlazorAddonsDemo/Features/BlazorTest/MyBlazorCounterComponent.razor
MyBlazorCounterComponentBase.cs
I created this backend base class to evaluate that I could use Optimizely CMS API within the Blazor component. But you don't need to do that if you just want to work in the *.razor file and add your logic to the @code section.
One of the properties has the name “ContentId” and is used to send in the “ContentId” to the Blazor component to be able to get information about the content context. Also added another property that “Inject” and create an object of type IContentRepository via dependency injection to be able to communicate with Optimizely CMS.
So now we have a Blazor component that we can reuse.
Example source code: https://github.com/Epinova/BlazorAddonsDemo/Features/BlazorTest/MyBlazorCounterComponentBase.cs
Gadget
In short: To create a gadget
- Make sure that module.config in the root folder have a reference to your assembly name.
- Create a MVC controller with the “IframeComponent” attribute.
- MVC view that render and load the Blazor component.
I created a sub folder with the name BlazorGadget (/Features/BlazorTest/BlazorGadget) where I created the following files:
BlazorGadgetController.cs
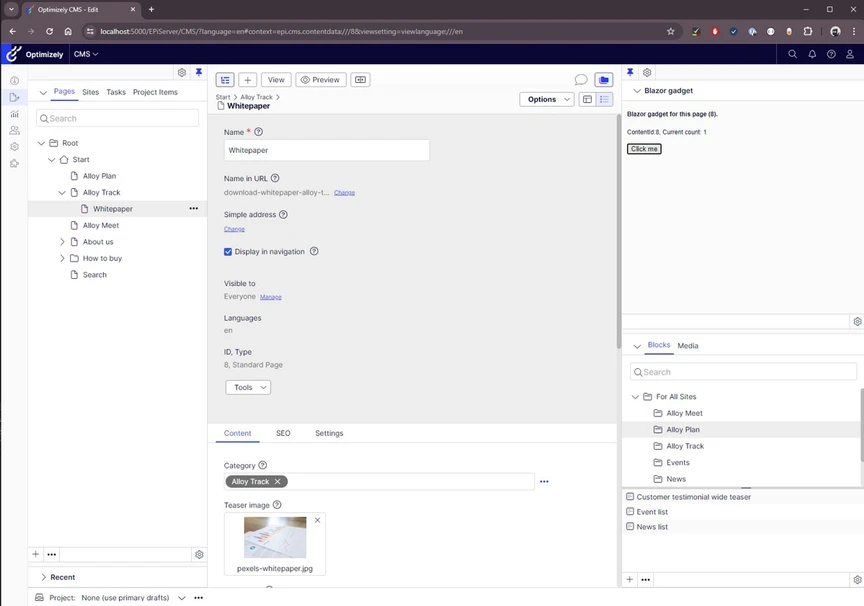
The controller is a regular MVC component that will handle the route and match requests. Since it is pimped with attribute “IFrameComponent” it will register as a gadget. Then editors can add the gadget to the assets pane. The controller also has Index method that will automatically trigger and load the view “BlazorGadgetView.cshtml” and we will pass on a view model with some data.
Example source code: https://github.com/Epinova/BlazorAddonsDemo/Features/BlazorTest/BlazorGadget/BlazorGadgetController.cs
BlazorGadgetView.cshtml
In the view we show information and load the Blazor component. In this case we also pass in a parameter that tells the component which “ContentId” we are working. I did this to evaluate how to pass in params to the Blazor component.
Example source code: https://github.com/Epinova/BlazorAddonsDemo/Features/BlazorTest/BlazorGadget/BlazorGadgetView.cshtml
BlazorGadgetViewModel.cs
The view model will transport information that we need to send to the Blazor component.
Example source code: https://github.com/Epinova/BlazorAddonsDemo/Features/BlazorTest/BlazorGadget/BlazorGadgetViewModel.cs
Report(s)
I think that developers should create more reports for editors or them self. So, this in example I created an example report that search for strings in the database to give a little more example how it could be done.
In short: To create a report
- Create or update an existing menu provider and add menu item(s) for your report(s).
- Create MVC controller that handle the routing.
- MVC view that render and load the Blazor component.
I started by creating a sub folder with the name BlazorReport (/Features/BlazorTest/BlazorReport/) where I created the following files:
BlazorReportMenuProvider.cs
In my case I did not have any other report menu providers, so I needed to add the Optimizely default menu item. If you have another that has already specified that one you can skip that. My understanding is if you have more than 1 report menu provider it will reflect and find these and put all menu items together.
I this example I created four menu items.
- Optimizely default reports
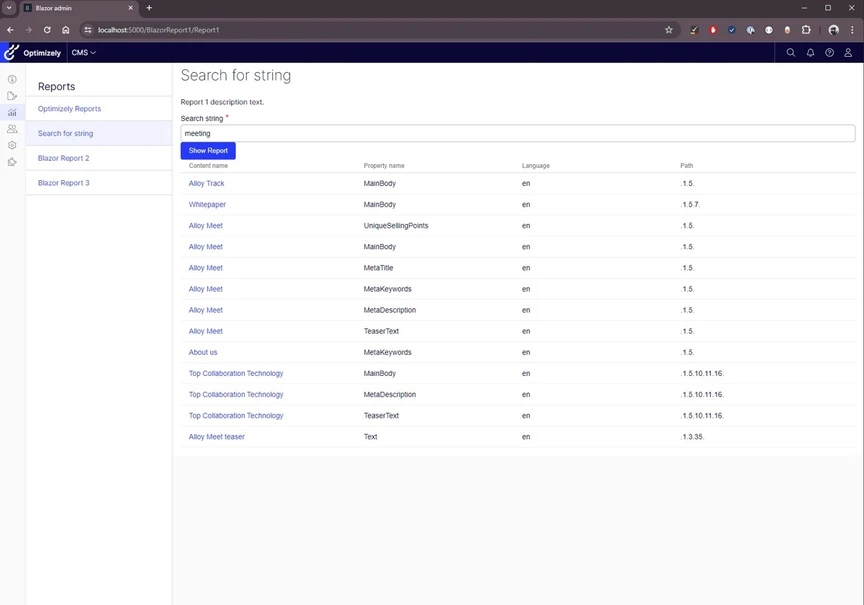
- Blazor report 1 that I will call “Search for string” since I made an extra Blazor component for demo purposes.
- Blazor report 2
- Blazor report 3
Also, for demo purpose I have let report 1 and 2 to use one controller and report 3 has its own. I did that to show that you can solve your functionality as you wish.
Example source code:
BlazorReport1Controller.cs
Regular MVC controller that will manage the routing for 2 reports. Report 1 and report 2. It will load the Report1.cshtml and Report2.cshtml views.
Example source code:
Report1.cshtml
Render the view and load our special Blazor component with the name Report1Component that is a small demo of a working report. More information in the Report1Component*.
Example source code:
https://github.com/Epinova/BlazorAddonsDemo/Features/BlazorTest/BlazorReport/Report1.cshtml
Report1Component.razor
This Blazor component present a report where you can search in the LongString properties in the database. It will present a table of links of matching pages/blocks that has properties with that content. I have also added a small “Spinner” example so if the search is long running it will show a spinner until search is finished.
The spinner is defined in _LayoutBlazorAdminPage.cshtml and are located in /wwwroot/js/spinner.js
Example source code:
https://github.com/Epinova/BlazorAddonsDemo/Features/BlazorTest/BlazorReport/Report1Component.razor
https://github.com/Epinova/BlazorAddonsDemo/wwwroot/js/spinner.js
Report1ComponentBase.cs
This is the code-behind file for the Blazor component. If you want you can have this code in the *.razor file. But I like to separate the logic. In this code there are example of inject Logging, Configuration and IJSRuntime. The IJSRuntime make it possible to execute JavaScript functions that is specified in the MVC view or Layout page. For this example, I am using it to start and stop a spinner for long running queries.
Otherwise, I am in this example just use Dapper with a TSQL query that search in the LongString properties after the search string that the user is searching for.
Example source code:
https://github.com/Epinova/BlazorAddonsDemo/Features/BlazorTest/BlazorReport/Report1ComponentBase.cs
Report2.cshtml
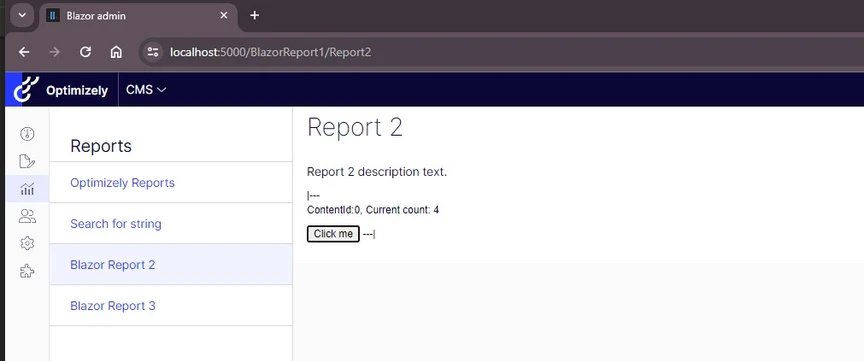
Render the view and load our special Blazor component with the name MyBlazorCounterComponent.
Example source code:
https://github.com/Epinova/BlazorAddonsDemo/Features/BlazorTest/BlazorReport/Report2.cshtml
BlazorReport3Controller.cs
Regular MVC controller that will manage the routing for Report3. It will load the Report3.cshtml view.
Example source code:
Report3.cshtml
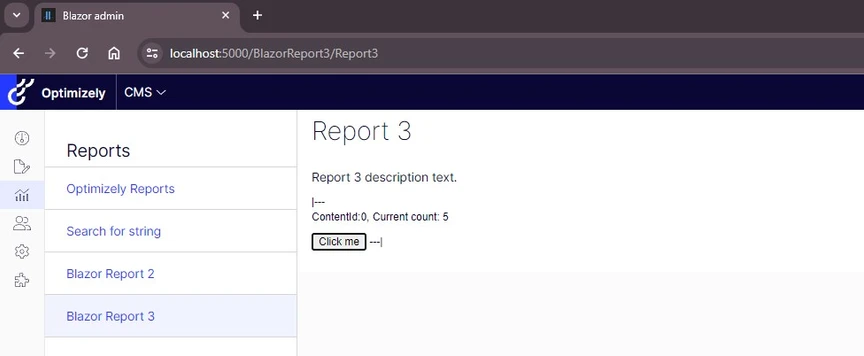
Render the view and load our special Blazor component with the name MyBlazorCounterComponent.
Example source code:
https://github.com/Epinova/BlazorAddonsDemo/Features/BlazorTest/BlazorReport/Report3.cshtml
CMS Add-on
In short: To create a CMS addon section
- Create a menu provider and add menu item(s) for your page(s).
- Create MVC controller that manages the routing.
- MVC view(s) that render and load the Blazor component.
- Create the blazor component(s)
I started by creating a sub folder with the name BlazorCmsAddon (/Features/BlazorTest/BlazorCmsAddon/) where I created the following files:
BlazorCmsAddonMenuProvider.cs
I created a menu provider for my addon pages section. I call it CMS addon because it will show under “Add-ons” in the CMS editor menu.
I added 3 menu items:
- Overview
- Overview
- Page2
Why I added two overview is because they are a little bit different, and I realized that the “Add-ons” will not even show if I don’t have a menu item that is “creating” the section.
The first one has the path “/global/cms/blazorcmsaddon” and the second has the path “/global/cms/blazorcmsaddon/overview” but they point to the same URL “/BlazorCmsAddon/Overview”.
So, by doing this you will get the “Add-ons” menu item to show up and show the section/add-on “Blazor CMS Add-on”.
Example source code:
BlazorCmsAddonController.cs
Regular MVC controller that will manage the routing for Overview and Page2.
Example source code:
Overview.cshtml
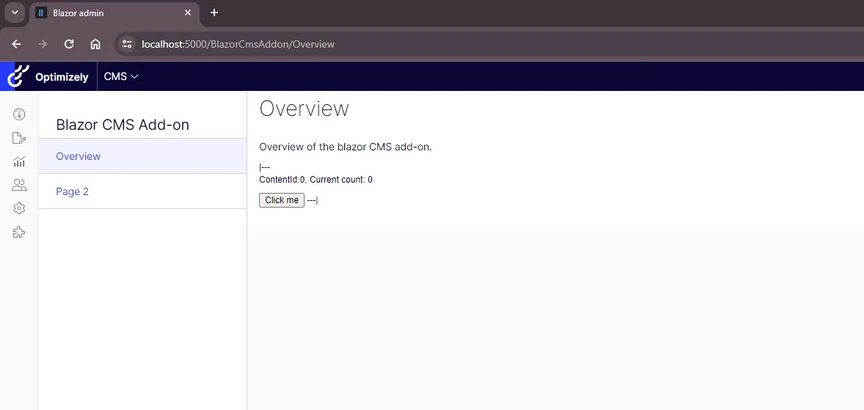
Render the view and load our special Blazor component with the name MyBlazorCounterComponent.
Example source code:
https://github.com/Epinova/BlazorAddonsDemo/Features/BlazorTest/BlazorCmsAddon/Overview.cshtml
Page2.cshtml
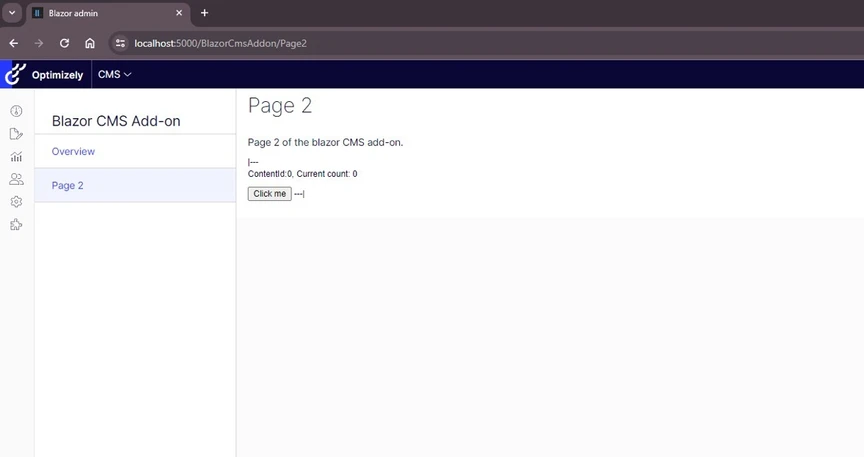
Render the view and load our special Blazor component with the name MyBlazorCounterComponent.
Example source code:
https://github.com/Epinova/BlazorAddonsDemo/Features/BlazorTest/BlazorCmsAddon/Page2.cshtml
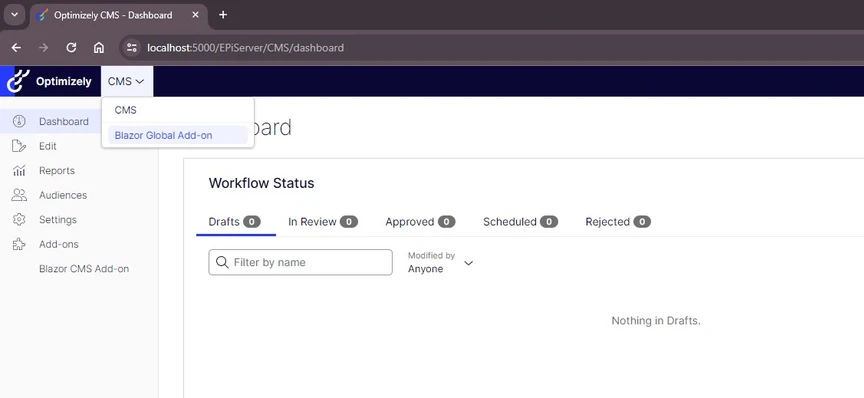
Global Add-on
There are times when you want to create a global admin add-on that show up the top menu level. Perfect for developer tools and other cool stuff that you can produce.
In short: To create a Global add-on/section
- Create a menu provider and add menu item(s) for your page(s).
- Create MVC controller that manages the routing.
- MVC view(s) that render and load the Blazor component.
- Create the component(s)
I started by creating a sub folder with the name BlazorGlobalAddon (/Features/BlazorTest/BlazorGlobalAddon/) where I created the following files:
BlazorGlobalAddonMenuProvider.cs
I created a menu provider for my global addon pages. I call it Global addon because it will show up in the top menu in the CMS editor menu.
I added three menu items:
- Overview
- Overview
- Page2
Why I added 2 overview is because they are a little bit different, and I realized that the Global add-on will not even show if I don’t have a menu item that is “creating” the section.
The first one has the path “/global/cms/blazorglobaladdon” and the second has the path “/global/cms/blazorglobaladdon/overview” but they point to the same URL “/BlazorGlobalAddon/Overview”.
So, by doing this you will get the menu item to show up and show the section/add-on “Blazor Global Add-on”.
BlazorGlobalAddonController.cs
Regular MVC controller that will handle the routing for Overview and Page2.
Example source code:
Overview.cshtml
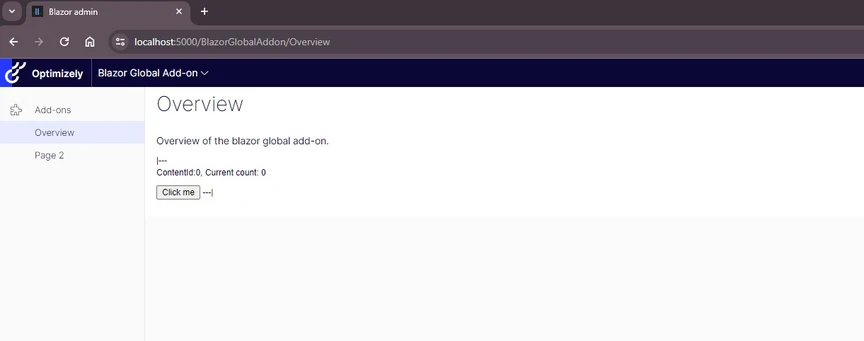
Render the view and load our special Blazor component with the name MyBlazorCounterComponent.
Example source code:
https://github.com/Epinova/BlazorAddonsDemo/Features/BlazorTest/BlazorGlobalAddon/Overview.cshtml
Page2.cshtml
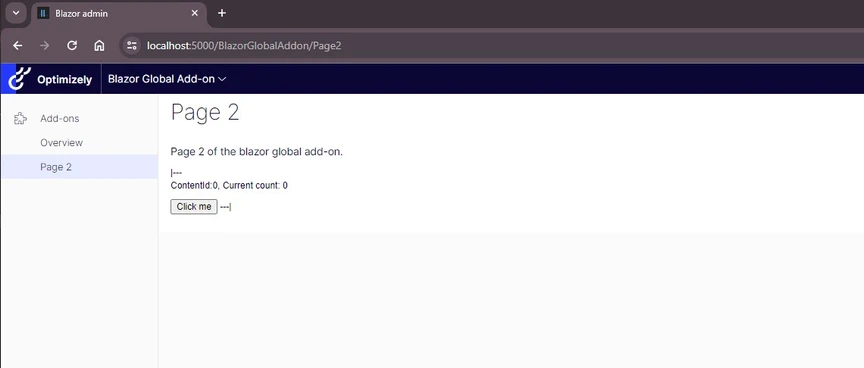
Render the view and load our special Blazor component with the name MyBlazorCounterComponent.
Example source code:
https://github.com/Epinova/BlazorAddonsDemo/Features/BlazorTest/BlazorGlobalAddon/Page2.cshtml
Settings
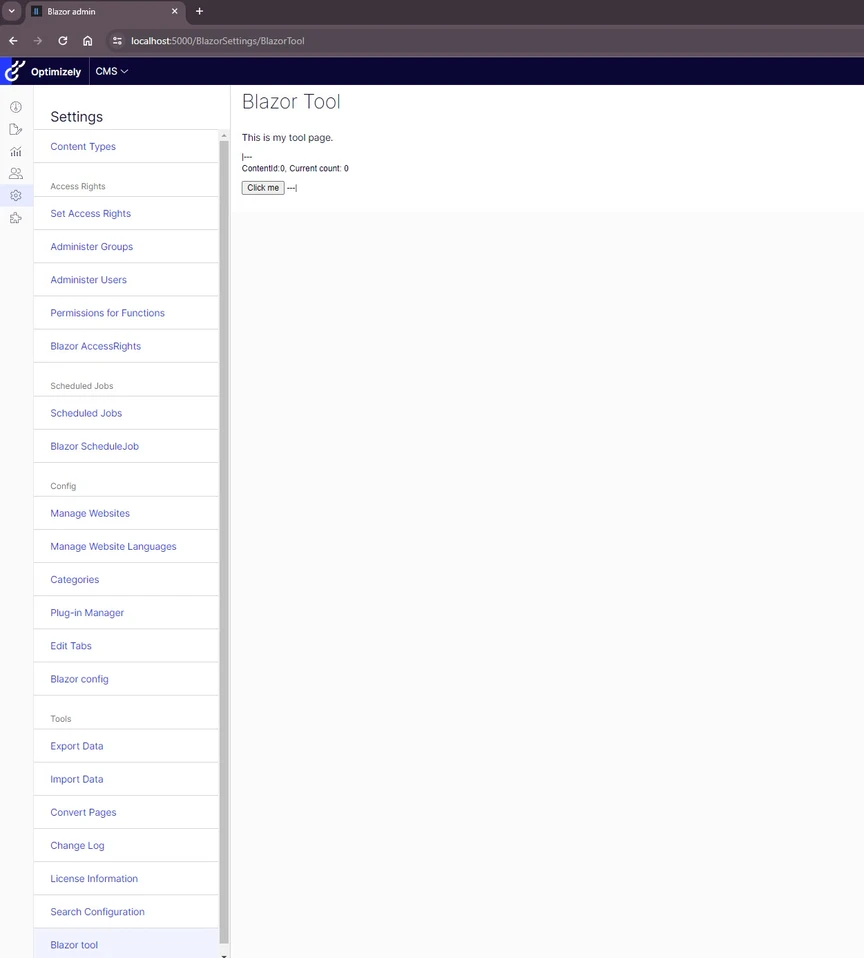
When I was writing this blog post I realized that I also wanted to evaluate to create pages that show up in the “Settings” area. I realized that it was straight forward. So, I added this example as well.
In short: To create a setting page
- Create a menu provider and add menu item(s) for your page(s).
- Create MVC controller that handle the routing.
- MVC view(s) that render and load the Blazor component.
I started by creating a sub folder with the name BlazorSetting (/Features/BlazorTest/BlazorSetting/) where I created the following files:
BlazorSettingsMenuProvider.cs
I created a menu provider for my settings pages. The tricky part with this was to figure out what paths that could be used to get the page to show up under the different sections:
These are the ones I found:
- /global/cms/admin/accessrights/[yourpage]
- /global/cms/admin/scheduledjobs/[yourpage]
- /global/cms/admin/configurations/[yourpage]
- /global/cms/admin/tools/[yourpage]
Example source code:
BlazorSettingsController.cs
Regular MVC controller that handle the routing for settings pages.
Example source code:
BlazorAccessRight.cshtml
Render the view and load our the Blazor component with the name MyBlazorCounterComponent.
Example source code:
BlazorScheduleJob.cshtml
Render the view and load the Blazor component with the name MyBlazorCounterComponent.
Example source code:
BlazorConfig.cshtml
Render the view and load the Blazor component with the name MyBlazorCounterComponent.
Example source code:
https://github.com/Epinova/BlazorAddonsDemo/Features/BlazorTest/BlazorSetting/BlazorConfig.cshtml
BlazorTool.cshtml
Render the view and load the Blazor component with the name MyBlazorCounterComponent.
Example source code:
https://github.com/Epinova/BlazorAddonsDemo/Features/BlazorTest/BlazorSetting/BlazorTool.cshtml
Outro
I hope this will be useful to you and help you create more awesome functionality for your Optimizely CMS projects.
For the source code and latest documentation and guides please visit the repo on GitHub. Where all code, documentation exist.
Sources:
https://docs.developers.optimizely.com/content-management-system/docs/using-menu-providers

Vi vill gärna höra vad du tycker om inlägget
Luc Gosso
Thank you very mucho Ove. That will help many get started. More counters to the editors!! =)