How to implement Optimizely Data Platform (ODP) in your website
Optimizely Data Platform (ODP) is a tool you’ll want in your stack. In this post, I’ll Walk you through how to get started with ODP as a developer - from adding the JavaScript tag, handling consent, and setting up environments, to verifying that your event tracking is working. We’ll also look at what ODP gives you out of the box with its automatic pageview event tracking.
Implement the ODP JavaScript tag
To start using ODP on your website, you’ll need to add their JavaScript tag. This can be done in two main ways:
- Direct integration: Copy the tracking script provided by ODP and add it to your site manually, in the
<head>section - Google Tag Manager (GTM): A more flexible approach if you already manage scripts through GTM. Just paste the script into a new tag, configure the trigger (e.g., on all pages), and you're good to go.
Tip: You can find full implementation details in the official ODP documentation
Handling consent
If your site uses a consent management system to handle GDPR or other privacy requirements, you’ll need to make sure the ODP script only runs if the user has accepted tracking.
Depending on your consent solution, you can either:
- Use GTM's built-in consent settings and triggers to ensure the tag only fires when appropriate
- Wrap the script in a conditional block that checks consent before execution.
ODP environments: Test and Production
One of the really nice features of ODP is that it provides two separate environments—test and production. This makes it easy to develop and validate your implementation without polluting your live data.
How to set it up
Each environment has its own Tracker ID (you’ll find them in the ODP UI under Settings → Account Settings). A common setup is:
- Use the test Tracker ID for your local and UAT environments.
- Use the production Tracker ID only in your live environment.
To manage this, you can configure your project to read the correct Tracker ID based on your environment setup (e.g., from appsettings.json, environment variables, or config transforms).
How to test and debug ODP Event Tracking
Once your test environment is up and running, there are two ways to verify that ODP is working:
- In the browser – Open your browser’s developer tools and:
- Look for the zaius object in the console. If it’s defined, the SDK is loaded correctly.
- Go to the Network tab and filter by
zaius.gif— this is the pixel request ODP sends with event payloads. You can inspect the query string to see the event data being sent.
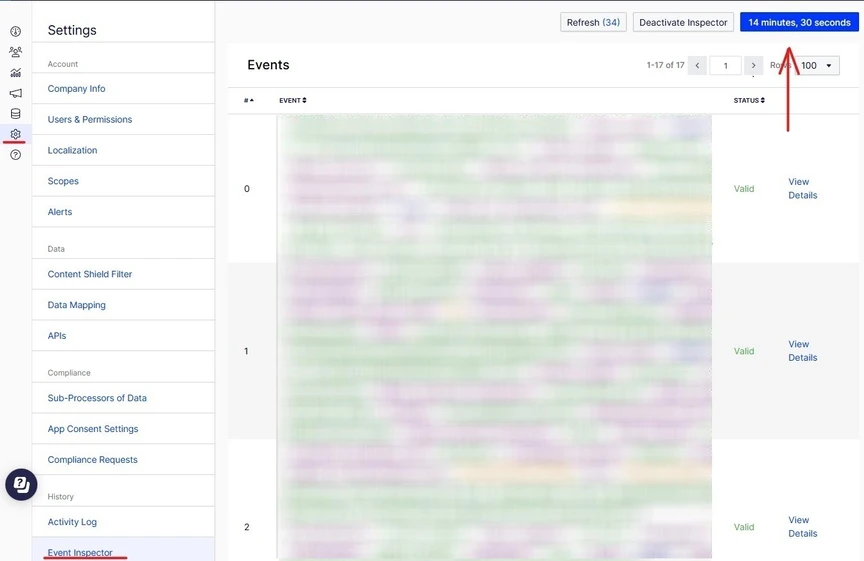
- In the ODP UI – Head over to: Settings → Event Inspector
- Click Start Inspecting (15 min)
This enables a live event log that will show all the events being pushed in real-time—a super helpful tool during development and QA.
Note: The zaius object name is a legacy reference from before Optimizely acquired the customer data platform Zaius in 2021. Read the official announcement from Optimizely
PageView tracking: what you get out of the box
When you implement ODP’s JavaScript SDK, it automatically starts tracking a pageview event on every page load, no custom setup needed.
This out-of-the-box tracking includes a rich set of properties like:
- Traffic source details, including:
- referrer – the full URL the user came from (e.g. https://www.google.com/)
- source – the platform or domain (e.g. google, facebook, newsletter)
- medium – how they arrived (e.g. organic, email, cpc, referral, direct)
- Browser & device details: User agent string – includes device type, browser, OS, and version
- Language and location metadata
- Page metadata – like title, and page path
- Screen resolution & viewport size
- Visitor identifiers –
vuid,tracker_id, and whether they are a new user
Summing up
Getting started with ODP is actually pretty smooth. With just a few steps—adding the JavaScript tag, managing consent, and configuring your environment—you’ll have event data flowing in and ready to use.
Out of the box, ODP gives you a solid baseline with automatic pageview tracking that includes device, browser, referral source, and more. You can start exploring this data right away using the Event Inspector in the UI.
But that’s just the beginning.
In an upcoming blog post, I’ll walk through how to go beyond the basics and implement custom events tailored to your customers' goals—things like add-to-cart, form submissions, newsletter signups, and more.

Vi vill gärna höra vad du tycker om inlägget